

The S-5-S is a base-clamp used for mounting on standing seam roofs. For installation of Ice Dam Heat Tape, use along with our S-5 SR Clip.
$9.50 – $239.95

The S-5 is the preeminent solution for any mounting application on standing seam roofs. Combined with our S-5 SR Heat Tape Clip, ice dam heat tape can easily be mounted to your standing seam roof. Using the S-5 SR Clip your heat tape is re-positionable and doesn’t require any tools to loosen or alter the position of your heat tape.
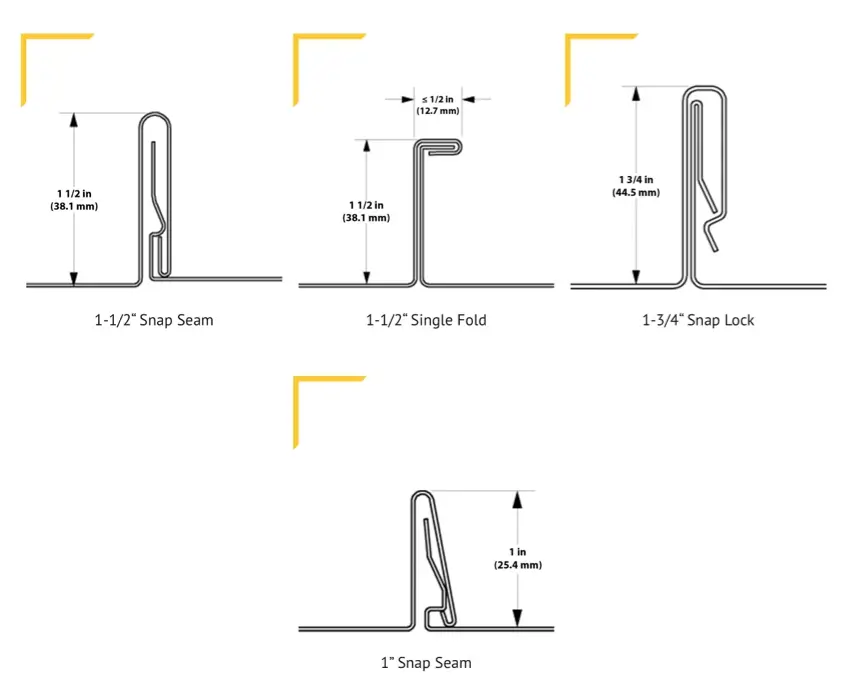
The S-5-S (“S” stands for snap-lock) is a non-penetrating, standing seam metal roof (SSMR) clamp. The S is designed for most popular vertical snap-together profiles — typically with vertical dimensions of 1.5” (38 mm) and 1.75” (44 mm).
The S is also the perfect solution for traditional, single-fold (angle-seam) horizontal profiles of 1” (25 mm) and 1.5” (38 mm) seam height dimensions and all similar seam types.
In order for the S-5-S to fit the types of seams illustrated below, the finished seam must:
Installation is as simple as placing the clamp on the seam and tightening the round point Torx Drive (T30) setscrews to the specified tension. Then, affix ancillary items using the included bolt. (See Linked Installation Manual Above)
“Heat Tape Pro did exactly what I needed it to do. Now I don’t have to worry about water leaking into my house, because I can tell when it’s working by the little light on the end of the cable.”
-Michael P.
Amazon Customer
“This heat tape works as advertised. It was delivered to me fast, and although it’s a little complicated to install, the documentation is good..”
-Shaun D.
Radiant Solutions Customer
“I install thousands of feet of heat tape every year. This is the best stuff I’ve found to protect my customers homes and give them the piece of mind they need.”
-Patrick B.
Professional Installer
The short answer is NO. Self-regulating heat cable does not turn itself on and off automatically. To do that you need to put the cable on a switched circuit or outlet or on a controller. Of course, you can also be old-school about it and simply plug and unplug as needed.
“Self-Regulating” refers to the fact that these cables are temperature sensitive. Due to their construction, these cables sense changes in temperature along their entire length, demanding more power as temps fall and less when they rise.
PipeFreeeze Pro™, Pipe Freeze Protection Solution has a built in thermostatic switch, meaning it will turn on and off on it’s own.
Heat Tape Pro™, does not contain a built-in thermostatic controller. We recommend adding the ThermaCord™ Thermostatic controller to turn your Heat Tape PRO to turn the cable on and off with changes in temperature.
Heat Tape PRO can be use with any gutter system made, be it open, closed, metal, plastic, vertical or horizontal. Heat Tape PRO will work throughout the winter to keep an ice free path open for water so it can escape and move away from your home.
Keep in mind that if your home has ice dams in addition to ice in your gutters, you will want to install Heat Tape PRO on your roof to address that problem as well. Heat Cable in the gutters alone will not manage problematic ice on the roof surface.
Radiant Solutions has the most comprehensive installation system for Heat Tape that exists. We make accessories to install heat tape on almost any kind of roof.
Click here to learn about product specifically for Natural Cedar Roofs
We work with licensed roofers, electricians and other contractors as Installers of Radiant Solutions Products. We know of installers all over the country.
If you are interested in finding a Heat Tape PRO™ installer in your area, click here to submit your info. If we have an installer we know of in your area, we will send you a recommendation.
We are building a hand guide to identify what kind of roof you have and find the clips that can/should be used with that roof-type.
View the Guide Explaining What Clips You Need Here
We have a guide on How to Measure for Purchasing Heat Tape that will help you. Once you have your measurements, you can find our Heat Tape Calculator here.
We have a calculated rate based on the product in your cart if you choose to ship to Canada or Alaska.
More can be found here.
Heat Tape Pro and Pipe Freeze Pro are offered in many lengths from 6-foot up to 150-foot. These products are not designed to be modified, so you should pick the length you need and work with that length. These cables should not be altered and doing so would void any warranty on the product.
We offer heat tape on spools from 250-foot to 1000-foot. These spools are designed to be cut to length, made into multiple cables, etc. Heat Tape on spools needs to be hard-wired into a junction box, or have a power connection plug-in manually added to it for use. It also requires ends to be properly sealed and terminated. When working with Heat Tape on spools, a Licensed Electrician should be utilized to assure proper wiring per regional codes and standards.
This includes, but is not limited to:
The type of roof you have determines the roof clips and accessories needed. Check out our Heat Tape Installation Accessories.
Check out our full list of Frequently Asked Questions on our FAQ Page.
Take a Look at Our Heat Tape Installation Case Studies
Learn a Bit about Ice Dams and How & Why they Form


Find heat tape products & accessories for ice dam prevention and pipe freeze protection.
We may be able to help connect you with a Radiant Solutions Heat Tape installer in your area.
And Product Dimensions
Understand the problems that our products solve and the advantage Radiant Solutions has over our competitors.
Demand is high across the U.S. & installers are needed!
128-Bit encrypted connection
We’re here to help. We are a 35 year old, family-owned, American company who loves to hear from our customers.